Sunday, April 29, 2007

Princess Tee?


I'm still debating whether or not to call it something like "Princess Tee" or "Kahlan."

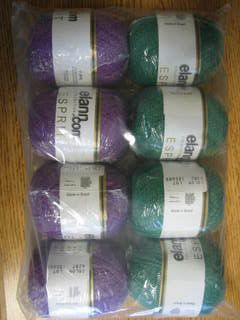
I've already used up 2 1/2 skeins. Yeah. I'm definately going to have to buy more. I would loooove to knit another one with a few simple modifications, and another type of yarn. I love the elasticity of this yarn, but something really soft like alpaca would be really nice too.

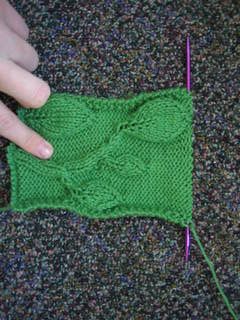
What do you think? I'm going to do 2 more ribbings before I go knitting solid again. I'm also debating about what I should do about the bottom. Of course, the most natural thing to do is a few ribbings.... but I think I would be dissatisfied with the results, since of my wide hip frame. I also thought about ribbing all the way down, but I thought that might accent the stomach area.
I'm still planning on adding beading and such to the material (yeah, after-the-fact-- but I don't have access to a craft store at the moment, and thought of it too late).

I have the neatest idea for a matching skirt for the raglan tee! It will look amazing together (I hope).

Also........
I just discovered the awesomeness of my non-univeristy public library on campus!! They have everything! Their knitting selection is huge! Here's some patterns that I liked when I went through Twinkles' Big City Knits & the 2005 Vogue Knitting magazine:

Thursday, April 26, 2007

I learned a couple new skills today.


So ok, all you continental knitters out there, this probably won't seem so grand to you, but I just learned how to officially:

1. "double knit" and
2. knit "continental" style, and
3. knit "continental" & "English" syle at the same time (for double knitting) &
4. purl "continental" syle.

I'm knitting up a revised version of the Caribou, with a different border, and I was happily knitting for 5 rows when I noticed that for some reason, it looked like I knit one extra row. Well, that wasn't the case, but I still ripped it. I'm sorry that I didn't take pictures before I ripped it, but here was the beginning of the potholder. Cool, huh? I love the colors together. The lighting makes the yarn look more blue, when it's actually a light sage green.

Pattern: my own
Needles: size 7
Yarn: caron simple soft (trying to destash,.. you know)

I'll start it up again later. My hand is cramping from holding the needle so tightly. I may know how to hold it different continental ways (still trying to figure out which way is most efficient for me), but the yarn either gets too tight around my finger, or too loose. That will take a while to adapt & to perfect.

~*~Update on (tba) raglan-tee soon. I promise.~*~

Wednesday, April 25, 2007

Other such things...

*Crunch, crunch, crunch....* Some may take that as the sound of pleasurable things, like food for example. However, the only crunching going on over hear is school work, unfortunately. lol.

On the positive side, I really am knitting. My new design is knitting up pretty slow, but the results are rewarding. (The stitches are pretty tiny, and I'm knitting it on smaller needles.)Once I get a little further, I'll claim it worth-while, and take a pic.

Tuesday, April 24, 2007

DPN 101

you'll never be afraid to use DPN's again... I hope.

Disclaimer: This is how I do DPNs. It has always worked perfectly for me. I push in the work because I feel that it collapses the needles better for faster knitting. Some people call this "knitting inside out," but really you knit the same exact way.

Things you should know beforehand:
1. "Working yarn"- is just another name for the yarn connected to the right needle, that's in use.
2. "Round"- is the term knitters use for knitting from the beginning stitch on the first needle until the last stitch from the third needle. Place markers usually seperates the beginning from the end, marking that you completed a whole round. In other words, It would be the "straight needle" equivalent to "row," but you have 3 needles.
3. Pull tightly on the yarn while working the first two stitches from each new needle. This makes sure that you don't have some serious "running ladders" in your knitted fabric. If you don't pull tightly, those "ladders" will show!
4. Knitting every row creates "stockinette stitch"- yup, it's magic! So, if you want some garter stitch, you have to "purl." Weird, huh?
5. The "Right Side" will be inside the circle, not on the outside---in this tutorial. That's the way I have always done it. :) I have found that it's easier to hold the needles this way. If you would like the RS on the outside, it's your preference. Do what's most comfortable to you.


~*~DPN Steps~*~

Step One: (If possible) ---cast all stitches onto 1 dpn.---


Step Two: Then, place the necessary amount on one needle, by sliding the stitches purlwise onto a spare needle. This should usually be about 1/3 of the total stitches from the original Cast-on needle.


Step Three: Then, go and slide the other portion purlwise onto another spare needle. Again, this should be roughly 1/3 of the original Cast-on stitches.


Step Four: Needle placement
So, this is what your needles should look like at this point. The "non working" yarn needle is on the left, while the "working yarn" needle should be on the right. You still have one extra dpn, right?? Just checking. :) You'll need that to knit!

First, line up your needles in a triangular fashion so that:
1. the stitches are not twisted
2. the "working" yarn needle should be on the right side.


Note that:
1.. The non-working yarn will be in the middle of those two non-joined ends, but once you inititally join the round, the hanging yarn makes for a good "place marker" to spot the beginning of every round.
2.. Look at "figure 2" (bottom of post) For needle placement.


ok, so now you are ready to really start!
**Side Note about the very 1st stitch: some people knit into the first stitch, only on the first round with the "working yarn" and the "non working" yarn strands, to minimize a gap. (see "Step Six" for picture of gap.) Because you "double knitted" there will be two stitches, instead of one, so make sure you knit into both stitches (K2tog) on the second round, or you will end up with one extra stitch in the long run!

View of knitting the first few stitches of first dpn & also knittting the first stitch of second dpn

Step Five: (in pink) What you do over, and over, and over....
Take that extra dpn, and knit (like you normally would knit) into the 1st stitch from the left hand needle by using the "working yarn" from the right hand needle. By doing this, you "joined the round."

**For now on, just: Knit to the end of the row of each dpn, take that empty needle, and start knitting in the same manner onto the next dpn on the left! And then, the last dpn**

yeah, It's just that simple.

You're still pulling tightly on every new needle, right? Just checking...
Oh no!! Why do I have a gap?!?
Once you have completed your first round, you will notice a gap that seperates the last needle from the first. This is normal. Just pull the yarn tightly while knitting the first couple of stitches (as you should while knitting the first couple of stitches on every needle) and it will look normal after knitting several rounds. Trust me.
***Just don't pull too incredibaly tight that you can't knit into the stitch on the next round.


~*~Additional notes~*~
Figure: 1
Keep working step 5 until you are done. Bind off using the extra needle like you would on "Straight needles." once you get to the end of each dpn, just set it aside!

Figure: 2
Here's the position of the needles, and a view of what your sock would look like if you knit it the "usual" way...not "inside out," like I do it. Notice that all of the material is out on the outside (in the way of your hands, lol.) Also notice that once side is on top of a needle, and the other end is under?
*** P.S- the sock has the RS on the outside because I pulled it through the middle to try it on.


Enjoy! You can knit socks, thick scarves, collars to sweaters, mittens and such with DPNs, when circular needles are too large for how many stitches you have.

Sunday, April 22, 2007

~Colored Knitting Charts~

~Anna's Colored Charts for knitting~

1. Some Pictures are distorted because they were resized to fit next to eachother.
2. Mostly all of the charts would look great with a black backround, and could be used for "double knitting" projects. :)
3. Click on the picture to enlarge, if you cannot read it. Copy & paste it to Word, then adjust it to an appropriate size.
4. Please read footnote.


~Symbol or Cultural Motifs~


Atlantis: I was really interested in Atantian symbols from the disney movie "Atlantis."
Native American: I am taking a course in Native American Religions, and my book had some weaving designs on it, and really inspired me to make my own N.A patterns.
Almost Swiss: I guess its my Swiss version?
Retro Gingham: not so average colors anymore.

~Modern~

Water-like colors: this may sound weird, but there is a certain bathroom in a dormatory at my Univeristy had had tiles a little similar to these colors. I was...um...inspired do to intarsia/fairisle with these colors. I'm still experimenting with patterns.


~Picturesque~
Pond: The tree is supposed to look half dead.
Caribou: This one is my favorite. It looks like my "Caribou Coffee" mug. I love it to pieces! I was really proud of myself that I actually got it looking something like an actual animal! Let's just say it was a challenge to do the antlers and such!


~Knitting~

Knitting & Such: these were my first designs. I really don't feel like remaking them, so if you would like the pink needles one row lower, you'll have to just have to mentally do it. lol.

~Needles~
Pink heart needles: Those are my favorites. I still need to rework the "yarn."


~Parkour~

Parkour: if you don't already know what "parkour" is, google it and look up you-tube videos. Let's just say my fioncé was thrilled that I made him the official "parkour logo," since one of its kind doesn't already exist. Oh, did I forget to mention that Parkour is his "passion." Well, kind of. After he broke his collarbone, he's just doing the light things.


*All charts complimentary from "knitting up a storm."
**You are free to use them for your knitting projects, but please do not claim ownership or sell the charted designs. Merci. If you have any questions, just let me know.

Wednesday, April 18, 2007

Boy do I have a lot of news...

First of all, yahoo! My yarn arrived today! That was fast. It's such a wonderful feeling when you get a little white slip of paper telling you that you have a package, in the mailbox! I unwrapped one of the skeins from the package, and the yarn indeed is stretchy, like elastic. These should make one heck of a tanktop. The colors are "African Violet" and "Jade" from Elann.com. It's made out of 98% cotton and 2% elastic. Let's just say that there is enough elastic!
Photo Sharing and Video Hosting at Photobucket

I was also experimenting today with some cabled leaves with knitpick's cotton shine yarn. What do you think? I like it, but I would modify a few things. I was thinking about adding a trunk and taking out the botton left leaf. This isn't the same one as the "leaves and branches" tanktop idea I had.
Photo Sharing and Video Hosting at Photobucket

Also.... do you remember this guy? Well, I dragged him out of his little WIP pile, and finished it up! He's 100% simple and 100% generic and 100% plain. I love it though! For my next socks, i'm planning on doing something totally not plain.
Photo Sharing and Video Hosting at Photobucket
Yarn: wool-ease in turqouis. Half a skein or less per sock
Needles: Size 4 DPNS
CO: 48 stitches
Ribbing: 2x2
Photo Sharing and Video Hosting at Photobucket
Now on to the second one, right?


Lastly, I just wrote up "grafting 101" just a minute ago. It's posted just below this one. Have fun. :)

Grafting 101

GRAFTING 101 TUTORIAL

No sock or mitten with fingertip shaping should be completely without grafting. It is a relatively easy process, and I hope by the end of this tutorial you feel completely comfortable grafting all of your projects. The end result should be a seamless connection between the stitches on the two dpns.

Preparation Steps: A & B: complete steps A and B once.  
Make sure that your stitches are equally divided between two dpns, and that your working yarn is on the right. 

PREP STEP A: insert the darning needle into the 1st stitch on the front needle, as if the PURL. Pull yarn through. Leave stitch on needle.
Photo Sharing and Video Hosting at Photobucket

PREP STEP B: insert the darning needle into the 1st stitch on the back needle, as if to KNIT. Pull yarn through. Leave stitch on needle.
Photo Sharing and Video Hosting at Photobucket

Repetition Steps 1-4: repeat until you run out of stitches
Sing this grafting boot-camp tune: KNIT-PURL-PURL-KNIT!

STEP 1 (Front needle): insert the darning needle into the 1st stitch as if to KNIT. Pull yarn through. TAKE STITCH OFF OF NEEDLE.
Photo Sharing and Video Hosting at Photobucket

STEP 2 (Front needle): insert the darning needle into the 1st stitch as if to PURL. Pull yarn through. Leave stitch on needle.
Photo Sharing and Video Hosting at Photobucket

STEP 3 (Back needle): insert the darning needle into the 1st stitch as if to PURL. Pull yarn through. TAKE STITCH OFF NEEDLE.
Photo Sharing and Video Hosting at Photobucket

STEP 4 (Back needle): insert the darning needle into the 1st stitch as if to KNIT. Pull yarn through. Leave stitch on needle.
Photo Sharing and Video Hosting at Photobucket

*Repeat steps 1-4 until all of your stitches are used up. Secure with a knot on the WS of your work and then weave in the yarn. Then Voila!! You just grafted!

TIP: Some knitter choose to use a tool called a "darning egg" that they put into the toe of the sock to help them graft evenly. It's not completely necessary.
 
Your grafting should look seamless, as the V stitches should line up vertically between the front and back of the toe:
Photo Sharing and Video Hosting at PhotobucketPhoto Sharing and Video Hosting at Photobucket

Saturday, April 14, 2007

Be Speckled (KUAS Original Pattern)

Designed by Anna Maliszewski

This 2007 pattern has been re-written and sizes has been added to fit the smallest to largest women's hands.

The yarn I used is sadly discontinued, so I've provided some suggestion for yarns that work because quite honestly, isn't it all about the striping?

For mine, it surprised me with a sunrise & twilight effect.

Materials:
-YARN: Main Color: 75(95)(115)(140) yds of a worsted weight yarn that is spun with more than one color (that stripe). Note: pattern seen with a discounted yarn, Caron Simply Soft Shadows in “Mardi Grey.”
Contrast Color: 30-40 yds of a worsted weight yarn with a solid color. Yarn ideas: Try Elann’s “A-Series W01” yarn or Jojoland’s “Rhythm” yarn.
-NEEDLES: size US7 dpns, set of 4; 1 darning needle
 -OTHER NOTIONS: 2 Placemarkers

GAUGE: 5.5sts= 1’’ (or 2.5cm) & 7.5 rows= 1’’ (2.5cm)

Friday, April 13, 2007

Don't Look...Just Click!


Ok, so I splurged! I bought 4 balls EACH of African Violet & Jade.
Link:
http://www.elann.com/productdisp.asp?NAME=elann%2Ecom+Esprit&Season=&Company=&Cat=ALLY&ProductType=5&OrderBy=&Count=30

It's made from 98% percent cotton and 2% elastic. I'm planning on making two summery knits out of it. I just found Elann.com, and they have a lot of good cheap yarn. Yay. They have a lot of different yarns in the 3 dollar zone, for 50g (100+ yards). Next time, i'll get some sock yarn (which is only $1.98 per ball).
http://www.elann.com/productdisp.asp?NAME=elann%2Ecom+Sonata&Season=&Company=&Cat=ALLY&ProductType=5&OrderBy=&Count=45
Or colors for 25 cents more!:
http://www.elann.com/productdisp.asp?NAME=elann%2Ecom+Sonata+Print&Season=&Company=&Cat=ALLY&ProductType=5&OrderBy=&Count=46

The Clapoltis can be knitted cheaper with this yarn:
http://www.elann.com/productdisp.asp?NAME=elann%2Ecom+Adara&Season=&Company=&Cat=ALLY&ProductType=5&OrderBy=&Count=26
They come in pretty colors!