

Wednesday, May 27, 2009
"Mystery Knit" clue #2
Friday, May 22, 2009
A walk down garter lane
...plus "mystery knit" clue #1 in the bottom of post.
And don't even get me started on what type and quantity of buttons there were...

And don't even get me started on what type and quantity of buttons there were...

So, when desperate times call for desperate measures...do as I do, and pull out the "big guns." Ok, well, maybe the "big needles." Stick to the gartered pattern with nothing more complicated than eyelet-increases on the edges. It numbs the brain, while also keeping in tact the last shred of sanity you still possess.
What a breather.
MYSTERY KNIT, CLUE #1
A little background: Joe is receiving a "surprise" graduation gift after he completes his 3 week course that finishes around June 6th. I probably won't be done in 2 weeks. (Really, replace "probably" with "won't," because it's more like the truth and I'm just trying to be optimistic.) He will, though, get a few clues to try to figure out what the heck I'm knitting that will knock his socks off...and you guys can join along, trying to figure out what it is.
HOWEVER, please message-me your actual ideas/theories via Ravelry or email...as I really don't want you smarties ruining the surprise if you figure it out before he does. Keep in mind, he's a "nuggle" (non-knitting folk). And he will get to read these posts, and I'm sure he'll check the comment page just to cheat. You can use the comment page below to gloat about knowing what it is, or suggest ridiculous theories like me knitting him a rocket-ship, or something to that effect.
Ok, so here is clue #1: I started with 1 single stitch. I am up to 10,657 stitches, and 40% of the entire body of the object is done. Several inches ago, I complete 7,441 stitches...and using that information...when it is up to 80% completed, I will NOT have completed 21,314 stitches, but far, far greater.
This first clue is a little mathematical, and the next clue should be a B&W teaser of the object.
Sunday, May 17, 2009
The wedding shrug, v.1


Mother's Day & other such goodness


Above is some Inca Alpaca yarn that I bought 30% off when the whole "Rummage Sales" thing was going on in the suburban community the shop is located in. I plan to make gloriously soft intarsia mittens out of these. The yarn shop is darling, it's a mixture of arty stuff & a yarn shop, and it had much more than I imagined when I first learned about it on the web. This was from my second visit, when Joe and I went there.


Sunday, May 10, 2009
"Bobble Emergency" Tutorial: how to pull a Houdini
I've been working my arse of today finishing up my "Tie-the-Knot" wedding shrug. I have finally completed it, but I would first like to share my little "adventure" or should I say harsh "realization" after I casted off the last picot: 2 bobbles. MIA. For all to see. Freakin monkies...
"Okay-dokie. So here is the culprit:
Step 1: insert the tip of your needle into the "V" of the stockinette, where the beginning of your bobble needs to be (the smallest point of the bobble). Use the same size needle as your work.

"Okay-dokie. So here is the culprit:

Step 1: insert the tip of your needle into the "V" of the stockinette, where the beginning of your bobble needs to be (the smallest point of the bobble). Use the same size needle as your work.


Friday, May 08, 2009
Progress


Here's a close-up of the shrug. It's about 14'' long right now from the edge of the sleeve. I'll need to knit the main body for 22'' or so. That means I'm around half way done.

I went to two LYS in Iowa while I was visiting Joe this week. At Crazy Girl Yarns, I bought a "just in" 9'' circular needles in size 2 and two sample wool-washes. I'll either love or hate those needles, which I intend to use on knitting socks on-the-go. Right now I'm iffy.
I also bought two beautiful skeins of Miski baby llama yarn in a natural color, brown. They will one day be made into a silky scarf. It's very soft, and doesn't scratch my sensitive neck in the least bit.
Alright kids, back to work. Get those needles clicking...

Monday, May 04, 2009
Startitis

I've been in Iowa City for the past few days, visiting with the beau and making sure everything is on track. I'll be leaving Wednesday morning-ish, so I can get back to all of those piano lessons that I have to teach & make up that are inbetween them. Yicks. In the meantime, I've been knitting a little, and reading a couple of books to keep me busy (like the Yarn Harlots' "Things I learned from Knitting Whether I Wanted to or Not"). My wedding clock says it's one day under 5 months-a really frightening thought, as I have too much left to plan-so I better get cracking on my "Tie-the-knot" shrug I'm designing.
However, Startitis is kicking in, darn it, and is making my hands itch. I've been scouring through Ravelry patterns, and was blown away by a few patterns that I must knit ASAP:
However, Startitis is kicking in, darn it, and is making my hands itch. I've been scouring through Ravelry patterns, and was blown away by a few patterns that I must knit ASAP:


I'm absolutely in love with Alice Bell's "Bottom's Up" pattern as well. It would work great in the Spring and Summer months, and would look extra spicy with a belt & skirt. I'll need to find some sport weight for this.
Let's see, the other "main" patterns that I hope to cast-on for in the near, near future:
-EZ's Mittered Mits. With Noro yarn.
-Meghan Munro's Replica of the Secret Garden Tam. Red, like in the movie.
-Berroco's Dizzy hat.
-Berroco's Cisco with my own handspun yarn.
-Berroco's Juliana wrap.
-Ysolda's Cloud Bolero, but longer and with buttons.
-Jana Trent's Eloomanator Diagonal Dishcloth. In a darker yellow, like the pattern.
-Vaunda Rae Giberson's Wheatfield Dishcloth.
Yeah, I think you see my problem.
Well, back to some knitting. I'd like to visit the LYS today, inbetween Joe's studying. I'd also like to walk around the mall too, but I'm still on the boot, and it's hard to walk normal (Surprising, I know). I'm officially supposed to start walking without crutches today (although I've been doing that for a while, don't tell the doc), but I don't know if I should push it. It's hard to tell if it's almost healed. It's a pain test, but I'm still unsure whether or not the pain is from unused muscles, inflamed tendons surrounding the fracture, or the fracture itself. Maybe it's all of the above. Who knows. It wouldn't surprise me, having all sorts of health inflictions dumped on me all at once lately...
Monday, April 27, 2009
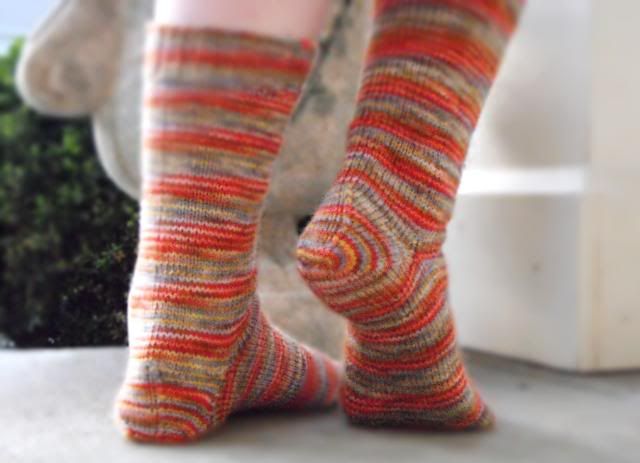
Star-Edged Socks
Do you ever get tempted to knit a sock in a pattern and literally "skip" the heel because it broke up the pattern? Now you can! (Mostly.) You can save your heel stitches for later. Make the heel your... brother, and not the other way around!
Intriqued? visit my in depth Afterthought Heel Tutorial for this pattern.
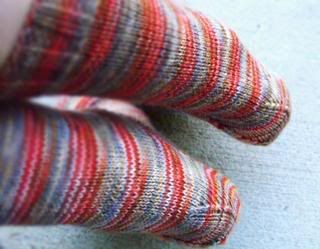
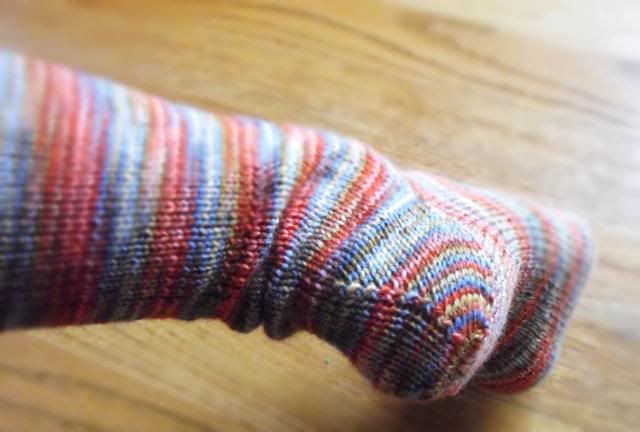
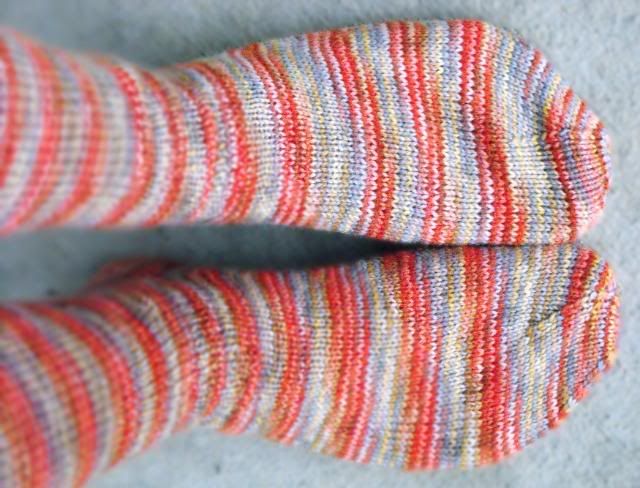
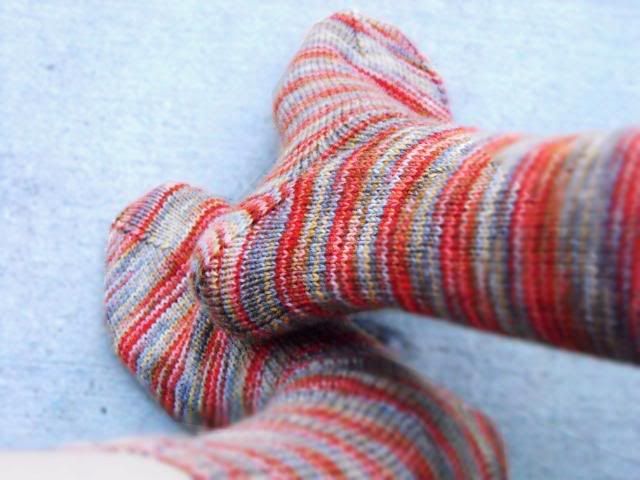 I like them. They feel very springish. You'll notice one curvy decrease on the heel in the photo below, but if you turn the foot, you'll notice that they are actually decreasing at 4 points. It's kind of tripy with variegated yarn.
 I hope you like these socks!
Intriqued? visit my in depth Afterthought Heel Tutorial for this pattern.

For this pair of socks, I decided to go the non-traditional route when it came to afterthought heels. I wanted my heel to look just similar to the traditional toes shaping. You can substitute with any sort of heel method like short row heels, etc, there's a lot out there.


Pattern: Star-edged Socks, by KUAS (yours, truly)
Yarn: approx 385 yds of KUAS' fingering weight yarn in the colorway "Butterfly"
Needles: size 2US dpns, set of 4.
Method: Top-down
Special features: Afterthought heel, Star-Toe decrease on the toes and heel.
Project: April 20th-26th 2009


Tuesday, April 21, 2009
The Complete "Afterthought Heel" Tutorial
AFTERTHOUGHT HEEL TUTORIAL
Pattern example: Star-Edged Socks by Anna Maliszewski

"Oh The Woe!" Sock Knitter Scenarios For Favoring Afterthought Heels:
SCENARIO 1: your trudging through your cable/lace work. You're really hooked on that pattern...cause you're finally getting it down-pat. And after a good 4-6 inches of leg work, you're like, "oh man, now I have to set aside the pattern, knit a 2.5'' heel, turn the heel, deal with picking up stitches on the sides, and working the gusset decreases before I can f-i-n-a-l-l-y get back to the pattern, figure out where I left off (or where I set the pattern and cable needles down at), and try to get into the cable groove? Woe is me!
SCENARIO 2: You're at the movies, or somewhere away from home, and you're knitting your sock in stockinette because you don't have to look down too much, and you finally make it to the heel. Are you honestly telling me that you can fiddle with the heel steps in the dark? If you can, can I please borrow you're super-powers?
SCENARIO 3: You like being unconventional! Oh, snap!
A tutorial on how to do the Afterthought Heel:Special note: I realize that in Part 1, my work is inside-out in the photos. When I knit with dpns, I usually like to knit this way because it's easier on my hands, even though it's non-conventional. Not all of the photos are setup this way.
Part 1: the set-upStep 1: knit up to the point where you would place your heel. A heel traditionally uses 50% of your total stitches. Depending on the sock pattern instructions, you may knit half the round with your working yarn before you knit the heel stitches with waste yarn, or you may be asked to begin the heel round with the waste yarn right off the bat. Jeez, manners!
Note: the stitches are distributed as thus, whether or not you choose to use 3dpns, or 4 dpns for your sock: 50% of sock stitches= front (I usually use just 1 dpn for this) and 50% of sock stitches for the heel (I split these into two dpns, 25% of stitches on each).
However, for the sake of simplicity, I start my heel right off the bat on the first 50% of my stitches (ex: 32sts) in the round, although it makes no difference if you choose otherwise.


Step 3: After knitting the specified heel stitches, drop the waste yarn, pick up the main working yarn again and continuing working on your current sock pattern in pattern.

Note: when you are supposed to knit a certain amount of inches before the toe shaping, measure from the waste yarn line.

Part 2: Releasing the "live stitches"
Step 1: It's time to unravel those saved stitches, now that you're done knitting the rest of the sock. whether or not your strand is hanging out on the "right side" of your work, or some how found it's way hanging out on the "wrong side," pull at the first part of the stitch on the right side of the sock, and pull the waste yarn strand out to release a stitch (actually, two stitches total per waste yarn stitch--refer to Step 2). The bottom stitch is being released in the photo below.
 |
| Figure 1 |
 |
| Figure 2 |
 |
| Figure 3 |
 |
| Figure 4 |
 |
| Figure 5 |
Part 3: Working the heel decreases
Step 1: Divide your heel stitches evenly among 3 or 4 dpns, depending on your preference (both needle preferences will have instructions for heel decreases.)
3 NEEDLES: This requires a 50%-25%-25% stitch distribution among your needles, and uses a "stitch marker." If you prefer to work only with 3 dpns, arrange your needles so that the heel has two needles (25% each of those total stitches) and the top part of the heel has one needle containing 50% of the total heel stitches, or simple all the stitches originally on it, with a marker in between half of the stitches. Example: If working with a "32st heel," the bottom dpns get 16 each, and the top needle has 32 sts total, but needs a marker after stitch 16.
Needle Numbers: The bottom left needle is needle #1, the top left needle is #2, and the bottom right needle is #3.
 |
| Figure 6 |
4 NEEDLES: divide your stitches up completely. Each needle will have 25% each of the total heel stitches. This means that you will just slide half from both the top & bottom of the heel parts on two two different needles. Use a saftey pin or place marker to indicate needle #1: between the two bottom stitches (where my thumb is).
Needle Numbers: The bottom left needle is needle #1, the top left needle is #2, the top right needle is #3 and the bottom right needle is #4.
 |
| Figure 7 |
Step 2 (for all dpn methods): Attach the yarn before Needle 1, and work the decrease rounds until you have 5 sts left, or 20 stitches total. End with one last knit round.
For 3 needles:
Rd 1: All needles: knit straight.
Rd 2: Needle 1: knit to last 3sts; k2tog, k1. Needle 2: k1, sl1, k1, psso, knit to the last 3sts; k2tog, k1. Needle 3: K1, sl1, k1, psso, knit to the end.
For 4 needles:
Rd 1: All needles: knit straight.
Rd 2: Needle 1: knit to last 3sts; k2tog, k1. Needle 2: k1, sl1, k1, psso, knit to the end. Needle 3: knit to the last 3sts; k2tog, k1. Needle 4: K1, sl1, k1, psso, knit to the end.
Trouble-shooting:
Closing the gap between the needles: I will use the 4 dpn method example. Refer to figure 7. To avoid big gaping holes at sides of the heel decreases, knit the last stitch of needle 1 with a stitch made in the gap between needles 1 and 2, and ssk a stitch made in the gap between needles 3 and 4 with the first stitch from Needle 4.
 |
| Figure 8 |
Feeling a bit snug? Try on your sock before completing all of the decreases. It's good to do this when you only have several more increases left. If you fear that your heel will not fit, you can slow down the decrease process a bit by adding one more "knit straight" round before the last few decreases. Example: *knit 2 rounds straight, then do a decrease round.* I recommend that you keep trying on the sock though, if you do this. You might not need to slow down the decrease process that much!


I bid you good knits! Have fun knitting up Afterthought Heels! I hope this tutorial helps you out!
Check out my pattern "Star-Edged Socks" to make a pair for yourself.
Subscribe to:
Posts (Atom)