Saturday, December 31, 2016

A Year in Review: 2016

Well, this year has come and gone, with the good and the bad.

This is the 5th year in a row that I have written a "Year in Review" post that shares my work for the entire year. My blogging has been irratic (and quite frankly, I post more regularily on our Facebook Group Page because it's faster), and I thought that I might not have a lot to show for the year, but I was surprised that the projects added up more than I originally thought.

No matter what 2017 brings, I hope you find happiness, fufullment, security, joy and love this coming New Year!

Let's start the show:


2016-- FOs (finished objects):


 2016--Other Crafting:

 2016-- Published KUAS Patterns (on Raverly):


2016--podcasting:


2016--WIPs still on the needles:


Other "Year in Reviews" from this blog:

Monday, December 26, 2016

KUAS Podcast: Christmas 2016 Vlog

I decided to vlog about the couple of days leading up to Christmas this year. You'll see finished knitted objects, baking, my family, Christmassy things, and me desperately trying to finish my last knitted gift in time for Christmas! I hope you had a wonderful holiday this year, and enjoy the New Year.


FINISHED OBJECTS FROM THIS VLOG:

 
ANTLER HAT
Read my blog post about it HERE

FRENCH PRESS SLIPPERS
 Read my blog post about it HERE

 
FISHERMAN'S RIB HAT
Read my blog post about it HERE


FO: French Press Slippers

Here's another Christmas gift that I knit very late in the game. This pattern has been on my queue for several years. I'm ashamed to admit that I was too cheap to purchase the $7 pattern, and I finally had to pinch myself a little bit and just pay for it, because these are beyond cute and make great gifts.

Pattern: French Press Slippers by Melynda Bernardi
Yarn: Paton's Classic Worsted Weight Wool
Needles: US 15
Size: 7/8
Started: 12/17/16
Completed: 12/18/16

If you knit these, make sure to label them similar to mine. They curl up and are hard to tell apart.

The knitting process is super quick. You can whip up both slippers in a day. It's the seaming and the felting process that is the most time-consuming. I haven't felted anything before in my high efficient top-loader machine, and I was having trouble getting it to agitate enough to felt, so I ended up doing them by hand. Yowzers.

You'll want to apply some paint (I used "puffy paint") if you don't sew suede to the bottom so that it can grip the floor. If you are already writing/drawing something, you might as well write some instructions?
I found the same large buttons as the pattern's at JoAnn Fabrics. This slipper benefits from a nice large button on the side.
I knit these for my MIL, who wears the same size shoes as me, and so it was easier to feel good passing them off since they fit me.

I have bought teal yarn and the same buttons for my own pair. I think I will make it in the beginning of the new year. For now, I have to make Joe's Antler Hat for his birthday January 5th.

FO: Antler Hat

Are you looking for a free hat pattern with simple cables that works up quickly? Look no further. I whipped up this bad boy in a few days, and it looks more complicated than what it is.
Pattern: Antler Hat (free pattern) by Tincanknits
Yarn: 1 skein Paton's Classic Worsted Weight Wool
Needles: US 6 and US 8 circular needles (magic loop method)
Modifications: 2.25 inch brim and only 6 antler cables before decreasing
Started: 12/18/16
Completed: 12/21/16
I made a cardboard cutout to open up the hat for presentation purposes as a gift. The cutout seemed to be the perfect size/shape, so I made an extra one for future photo sessions.
The cable pattern is pretty easy to memorize. The cables move further and further away from each other each time you have a cabled round. If my memory serves me correct, there's only 6 total rounds per rep.


Fo: Fisherman's Rib Hat

This is a simple hat pattern that is easily memorized, but can get you in the end if you don't mark down which round you have last completed, since the ribbing doesn't show you which round you just end with.

Pattern: Fisherman's Rib Hat (free pattern) by Christina Coutts
Yarn: 1 skein Lion Brand's Wool-Ease Chunky
Needles: US 6 and US 8
Started: 12/21/16
Completed: 1/24/16

A fisherman's rib is simply (in a multiple of 2 sts):
Rd 1: *k1below, p1* across the rd.
Rd 2: *k1, p1below* across the rd.

My modifications:
I started the brim of the hat on size US 6 needles and did regular 1x1 ribbing for 5 rds. Then I switched to the larger needles. I knit the fisherman's rib until the hat measured 7 inches, and then I did the hat decreases.

Here's a quick photo of the project. It's not my finest work, but it was completed in time for Christmas. It could have used a good blocking if I had the time.

Tuesday, November 29, 2016

"Beacon Hill" in the making

What's better than sunlight knitting with festive nails and hot tea at your side?

I've been hard at work, working on a new pattern with a name inspired by a location in one of my favorite series, Beacon Hill. It's a historic place in Boston, but it just felt "right" for the name for this project. If you can name a pattern after a person, you can name a project after a place.

Side note: I just found out that they re-released this discontinued series on kindle! The first one is free--try it out! It's got 1880's a Boston setting, with an amateur sleuth and a "Ross and Rachel" unrequited romance theme. I highly recommend this read!

This is the original one, made from 100% baby llama. The stitch texture is a little lost in the smooth and hairy yarn, so I decided to start a teal sample that I also used for making a youtube tutorial on the invisible cast-on and stitch pattern used in this pattern.

The cast-on is the invisible cast-on method, as the beginning and end of the scarf will be sewn together like sock toes. 
I tweaked a "Little Tent" stitch pattern from my stitchionary, and also added a thick garter border. This project will become an infinity scarf, with a hat and mitten set made afterward. The mittens and hat will not only have these little tents, but more modifications so it's not a one-trick pony.

Doesn't red, teal, white and black go together incredibly well?
I NEVER paint my nails. Besides the fact that my thumb nails split on the sides and now directly down the middle, I work far too much with my hands as a mother, knitter and pianist to not make the paint chip immediately. However, because I was making a tutorial, I decided "what the heck?" and went for a festive red color in lue of the holiday season. The polish proably won't last long, but I'm having fun knitting, teaching and even typing with more feminine nails. :)

It's the little things in life...
I'm smitten.

Friday, November 25, 2016

Crazy BLACK FRIDAY weekend deal!

Quick, there's a *Crazy* Black Friday (weekend) sale going on! Grab any of my patterns for HALF OFF! PLUS, IF YOU BUY MORE THAN 3 patterns (from 11/25-11/27), I will GIFT your friend a pattern of your choice!* This deal lasts until Sunday night.


Use this coupon at the checkout: KUASblackfriday2016
*After purchasing more 3 or more patterns (11/25-11/27), Ravelry message or email me to let me know the email address (or Ravelry ID) of the friend of whom you'd like to receive the (1) gifted pattern.

Tuesday, November 22, 2016

Christmas Give-away Contest! 5 Prizes!

Good morning,
Happy holidays! I am running a special KUAS give-away for those who knit my original patterns (free OR paid for patterns).  Please share this! There are FIVE prizes! Winners will be selected randomly. Please read the rules before participating to see how to qualify for said prizes. Projects could have been started as early as Oct 1st 2016...and you don't necessarily have to finish your project to win a prize!


WHO: U.S and non-U.S knitters.

RULES:
1.) Participants must knit ANY of my KUAS original patterns to qualify to win! Projects must be started no earlier than October 1st, 2016 and completed by December 20th, 2016 to be entered into the “grand prize” category. Those who DO NOT finish their projects CAN STILL qualify for the 2nd, 3rd, 4th or 5th prizes listed below. Winners will be drawn December 21st, 2016. After drawing the “grand prize,” I will mix all remaining participant’s names together (even those who didn’t win the grand prize)!

2.) You must post your WIP and/or your completed project photo (started no earlier than 10/1 and posted no later than 12/20 for the drawing) in THIS RAVELRY THREAD. If I can’t see it there, I won’t know to put your name in the drawing bowl. Please use only one post (edit your post to put in the completed photo). Please make sure to include in the post the name of the KUAS project, the date started/completed as well as the photos(s).

3.) The winners will be announced here and on my “Knitting Up a Storm” Facebook group 12/21/16, and winners must contact me via email (knittingupastorm@gmail.com) to give me their name and shipping address.

SO, what’s the prizes??

The Grand Prize winner gets all of this (only for those who complete their project):
 -->One FREE KUAS pattern of your choice
-->Two caked half-skeins of Creatively Dyed Yarns’ Exotic Flower fingering weight yarn (415 yds total; 75% superwash and 25% nylon). The main colors are red, green and blue.
-->A set of 5 peppermint striped stitch markers!

2nd Prize:
 This set of 5 stitch markers AND one FREE KUAS pattern of your choice.

3rd Prize winner gets:
 This set of 5 stitch markers AND one FREE KUAS pattern of your choice.

4th and 5th winners get: a FREE KUAS pattern of your choice.

May the odds be ever in your favor! Happy knitting and Happy Thanksgiving!!

Saturday, October 01, 2016

Fall stitch markers

 
I found these lovely charms at a craft store a while back, and I decided to make Stitch markers the other day.
 
I'm using them on my current pumpkin spice Flax Light Sweater project. Too cute.

Wednesday, September 28, 2016

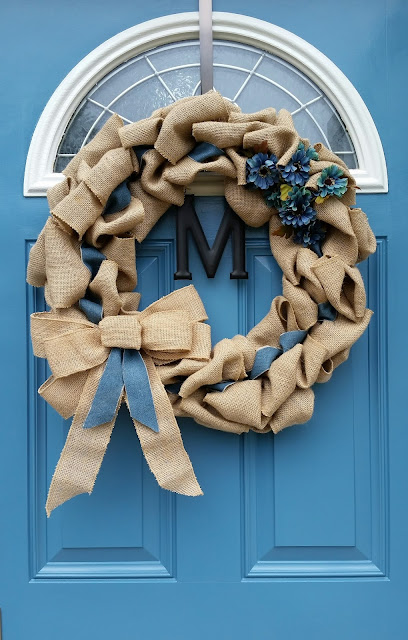
Burlap Wreath #3: "M" monogram fall wreath with orange accent

This is the 3rd installment of my burlap wreath making spree. I figured that an orange accent ribbon would really pop against the blue door.
It's the sibling of the "P" monogram wreath that I gave to my parents.
Materials:
30ish ft of burlap, 24 ft of accent ribbon that's wide, monogram letter, medium metal wreath, wire, wire cutter, and two accent fall pieces to garnish the wreath.
Fun stuff. Plus, if you scour Pinterest, you will come up with a trillion reasons to make more for every occasion!

Have you seen my other two burlap wreaths?

Burlap Wreath #2: "P" monogram wreath with green accent

My parents watch my boys twice a week while I teach piano lessons in the evening. As a small thank you gesture, I decided to make them this wreath that I'm absolutely in love with.
Materials:
30ish ft of burlap, 24 ft of accent ribbon that's wide, monogram letter, medium metal wreath, wire, wire cutter, and two accent fall pieces to garnish the wreath.
It was really hard to give this one up, but I did buy enough material to create a similar one, which you will find in the next post installment.

Need more wreath eye candy?

Burlap Wreath #1: year-round monogram wreath

Here's a confession: this is the first post (of three) of a new addiction in my craft world... burlap wreaths. I used this video to help me figure out how to wrap the burlap onto the metal frame. Before this project, I didn't even know they made metal frames for wreaths!

Materials: 
40 ft of burlap, burlap bow, monogram letter, accent ribbon, flowers, medium metal wreath frame, wreath wire (I used medium weight beading wire) and a wire cutter.
Half way done wrapping the burlap.

My door is blue, so I wove in an accent denim ribbon.
Need more eye candy? 

Friday, September 23, 2016

A Knitter Skill Unlocked: the Tubular Cast-On (with 1x1 ribbing)

Happy fall! I'm am literally a couple of inches away from finishing one of my twin's Flax Light sweater, but couldn't resist the charm that pumpkin spice yarn had to offer, so I've decided to have a "screw it!" type of attitude with project monogamy and just cast on for my adult Flax Light sweater.

I've heard on podcasts that tubular cast-ons are the way to go for ribbing. Not only is it stretchy, but the folded edge makes it look clean and professional looking. I watched Eunny Jang's video and have followed the instructions to a "T," even though it started my ribbing off with a purl stitch (I later moved the last knit stitch to the beginning of the round because I'm OCD'ing about keeping my ribbing 'k1,p1'). Side note- Eunny Jang's blog (she's stopped blogging on her personal site ever since she was offered a job at Knitting Daily) inspired me to create this blog in 2006...


In a nutshell: the process involved knitting stockinette st from waste yarn for several rows, knitting from your main yarn for several rows, and after picking up the first st bumps from your main yarn (see the video for this)...you CUT away the waste yarn. Eek!!

So, for your entertainment, I have documented my first time casting out Tubular Method:
4 waste yarn stockinette rows and 5 main yarn rows before tubular effect. You cast on half the amount needed.
You purl a live st, then pick up the first main color "bump," until you have double the cast-on amount.
So far, so good!

The whole needle completed! Time to grab the scissors! Eek!
You cut away the waste yarn underneath.
It acutally looks more like this mess.
You join the round, which will leave you with this nice little gap. I just sewed the waste yarn into it and it closed it right up. Next time, I will try to join the waste yarn in the round right off the bat.

And that's all folks! It was pretty painless and nothing unraveled. Just double check before you make the first snip that you have knit into ALL of the bumps from that main color's first row.

I'm onto the yoke now. Have yourself a great weekend!