Wednesday, September 28, 2016

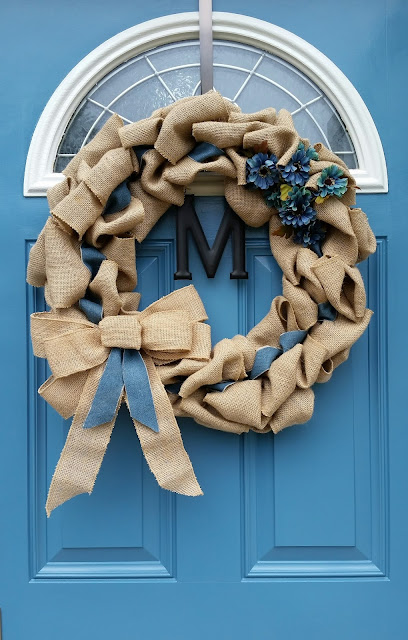
Burlap Wreath #3: "M" monogram fall wreath with orange accent

This is the 3rd installment of my burlap wreath making spree. I figured that an orange accent ribbon would really pop against the blue door.
It's the sibling of the "P" monogram wreath that I gave to my parents.
Materials:
30ish ft of burlap, 24 ft of accent ribbon that's wide, monogram letter, medium metal wreath, wire, wire cutter, and two accent fall pieces to garnish the wreath.
Fun stuff. Plus, if you scour Pinterest, you will come up with a trillion reasons to make more for every occasion!

Have you seen my other two burlap wreaths?

Burlap Wreath #2: "P" monogram wreath with green accent

My parents watch my boys twice a week while I teach piano lessons in the evening. As a small thank you gesture, I decided to make them this wreath that I'm absolutely in love with.
Materials:
30ish ft of burlap, 24 ft of accent ribbon that's wide, monogram letter, medium metal wreath, wire, wire cutter, and two accent fall pieces to garnish the wreath.
It was really hard to give this one up, but I did buy enough material to create a similar one, which you will find in the next post installment.

Need more wreath eye candy?

Burlap Wreath #1: year-round monogram wreath

Here's a confession: this is the first post (of three) of a new addiction in my craft world... burlap wreaths. I used this video to help me figure out how to wrap the burlap onto the metal frame. Before this project, I didn't even know they made metal frames for wreaths!

Materials: 
40 ft of burlap, burlap bow, monogram letter, accent ribbon, flowers, medium metal wreath frame, wreath wire (I used medium weight beading wire) and a wire cutter.
Half way done wrapping the burlap.

My door is blue, so I wove in an accent denim ribbon.
Need more eye candy? 

Friday, September 23, 2016

A Knitter Skill Unlocked: the Tubular Cast-On (with 1x1 ribbing)

Happy fall! I'm am literally a couple of inches away from finishing one of my twin's Flax Light sweater, but couldn't resist the charm that pumpkin spice yarn had to offer, so I've decided to have a "screw it!" type of attitude with project monogamy and just cast on for my adult Flax Light sweater.

I've heard on podcasts that tubular cast-ons are the way to go for ribbing. Not only is it stretchy, but the folded edge makes it look clean and professional looking. I watched Eunny Jang's video and have followed the instructions to a "T," even though it started my ribbing off with a purl stitch (I later moved the last knit stitch to the beginning of the round because I'm OCD'ing about keeping my ribbing 'k1,p1'). Side note- Eunny Jang's blog (she's stopped blogging on her personal site ever since she was offered a job at Knitting Daily) inspired me to create this blog in 2006...


In a nutshell: the process involved knitting stockinette st from waste yarn for several rows, knitting from your main yarn for several rows, and after picking up the first st bumps from your main yarn (see the video for this)...you CUT away the waste yarn. Eek!!

So, for your entertainment, I have documented my first time casting out Tubular Method:
4 waste yarn stockinette rows and 5 main yarn rows before tubular effect. You cast on half the amount needed.
You purl a live st, then pick up the first main color "bump," until you have double the cast-on amount.
So far, so good!

The whole needle completed! Time to grab the scissors! Eek!
You cut away the waste yarn underneath.
It acutally looks more like this mess.
You join the round, which will leave you with this nice little gap. I just sewed the waste yarn into it and it closed it right up. Next time, I will try to join the waste yarn in the round right off the bat.

And that's all folks! It was pretty painless and nothing unraveled. Just double check before you make the first snip that you have knit into ALL of the bumps from that main color's first row.

I'm onto the yoke now. Have yourself a great weekend!

Thursday, September 08, 2016

FO: Bee Stitch Dish Cloth and some WIPs

I came across the Bee Stitch on the internet about a week ago, and couldn't resist giving it a try for some fall dish cloths. The Stitch is really beautiful...it's a shame my camera really couldn't capture it's real texture essence in this color.
The Bee Stich is mostly just gartering. The only difference is the places where you see the deep V's, you knit below that stitch. So, in 4 whole rows in the pattern, you knit below a stich every other stitch for two rds and the rest is simply knit straight.
I made a Hobby Lobby trip to find fall colored cotton yarn for this project. I will knit one Bee Stitch Cloth per color. Hobby Lobby was running a sale on a lot of yarns and these were under two bucks each. The only downside is that the yarn is rather splitty.
The first one was knit to a 9x9 inch size. I might cut down 3 sts for the next two colors. Maybe.

Pattern: Bee Stitch Cloth (my own)
Yarn: Crafter's Secret Cotton (a little more than half a ball used--approx 70 yds used)
Needles: US 7 

I have been really keeping busy knitting while the boys are in Kindergarten. I am slowing working on my Seed Stitch Bath Rug that will look like this when it's finished.  It's so large right now (and the needles are a beast), that I am pushing myself to knit 4 rows each day so that it eventually gets finished. It's really just a back-burner project. 

I am still working on my carnival sock. Another back-burner project for my purse, but almost done. I have about 3 more inches before the toe decreases.

I am also working on the first Flax Light sweater for twin #1:
I am itching to start my own adult Flax Light in a pumpkin colored yarn that I recently bought in sport weight. HOWEVER, I should be finishing this fall cardigan though!
This is an old picture. I left off last year around the hips. It will have afterthought pockets and a button band or zipper installed. I haven't decided yet.