Wednesday, July 08, 2020

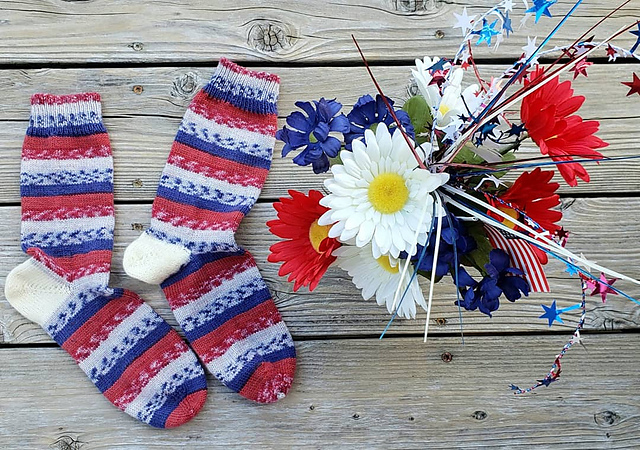
FO: Forth of July Socks

Happy Independence Day, America!
What's more festive than holiday socks? 🙌 These socks are red, white and blue...plus have a stranded colorwork motif! Did I do any of that labor? Nope!

When Cascade came out with this Independence "Heritage Prints," I knew they had to be 4th of July socks! I called them "American Socks" on my project page, but they can be French socks too. :)

American Socks

Method: top-down, short-row heel

  Needles: US 0 and US 1
1 skein = 437.0 yards (399.6 meters), 100 grams
52 Independence

I hope this post finds you well.  <3

FO: Wild Rabbit

Knitting this wild rabbit was fun. Claire Garland has other realistic looking knit animals that I look forward to tackling soon, specifically the a deer/fawn and cat. 

I found these animal eyes at Hobby Lobby, which makes the rabbit look even more realistic.

Project Notes:
Wild Rabbit by Claire Garland


US 6 - 4.0 mm

1.8 skeins = 255.6 yards (233.7 meters), 90 grams
1.8 skeins = 486.0 yards (444.4 meters), 180 grams
0.48 skeins = 129.6 yards (118.5 meters), 48 grams
1 skein = 135.0 yards (123.4 meters), 85 grams
Colorway130 Rose
Yarn Bee Tender Touch
1 skein = 135.0 yards (123.4 meters), 85 grams
Dove 


It was really neat witnessing the clever construction of the animal while knitting it. Claire Garland really has created something special because she has an eye for detail.

I added whiskers using flexible beading wire. It wasn't in the instructions, but I felt like he/she needed some to look complete.

FO: the Weekender Sweater

Long time no see, dear readers!
A year ago I started the process of updating you on my knitting adventures, and then I seemed to have fallen off the internet. It's been so long that Blogger looks different, and I had trouble logging in! In fact, I don't even live in that house anymore, nor use that phone! Ha.

I feel it's better to be late than not here at all, so let's take a look at the Weekender sweater that I finished in March 2019.


Since I didn't bother to make a WIP post, here's a quick tour of the process:

I used a tubular cast-on/off, because it's stretchy and clean looking. I highly recommend doing this for any neckline and hem to give it a professional finish.

Project Notes

The Weekender, by Andrea Mowry  Needles:
US 7 - 4.5 mm & US 8 - 5.0 mm


Yarn Bee Chloe  4.3 skeins = 1161.0 yards (1061.6 meters), 430 grams

:
20 stitches and 28 rows = 4 inches  in US 8

Notes:
I casted on for a size L instead of a M since I used US 6 needles and thinner yarn
CO 117sts with US 6. 1x2 rib for 2.5.'' Switch to US 8 needles for the body.
Days 1-2: tubular cast-on and completed bottom hem ribbing.
Days 3-13: body of sweater to 16.5’’.
Days 14-16: divided and knit the front bust section for 5.5’’, plus 1 row. Inserted a lifeline.
Day 17: worked W&T section and ribbing (US 6) for the front.
Days 18-19: worked on the back bust section for 5.5’’, plus 1 row.
Day 20: worked W&T section, and ribbing (US 6) for the front.
Day 21: finished ribbing, 3-needle BO, started sleeve #1
>>>Sleeve note: knit for 5.5’’ straight before starting the decreases. You will only get 9 total decreases. Knit 7 rows straight between decreases. After 9th decrease, the sleeve is 14.75’’ long.
Days 22-23: worked on sleeve #1
Day 24: worked sleeve 2’s ribbing and started sleeve #2.
Days 25-26: worked on sleeve #2.
Day 27: finished sleeve #2


I would definitely make this again, but in another type of yarn, such as something similar to Cascade 220.

Friday, March 01, 2019

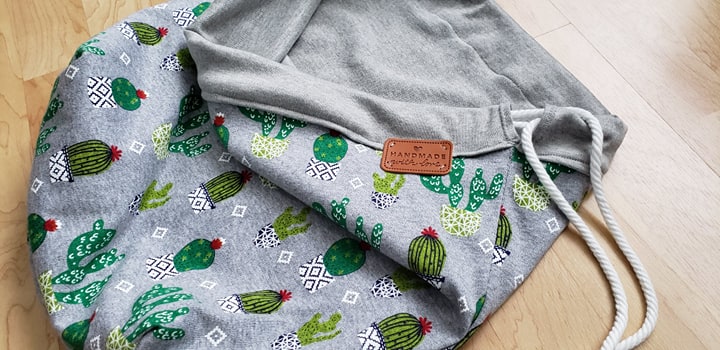
FO: Cacti Project Bag

Sometimes you make something that makes you smile from the inside out. This is one of those types of projects. This is an oversized knitting project bag for large items, such as sweaters, keeping multiple projects in one bag, or for blankets, if I ever climb on the crazy wagon (I dislike knitting on heavy projects).
This oversized project bag, despite the machine attempting to eat the fabric multiple times (I had to dismantle the needle plate even), was simple to make and is exceedinly pleasing as a project bag because:
  • The cute cacti fabri (it just HAD to come home with me from JoAnn's)
  • The material is very stretchy
  • The material is thin and flexible for a large lined bag
  • Pull-string bags are just fun to open and close
I have purchased a number of faux leather tags to add to projects, but haven't used any of them until yesterday. It's hard to find an object that can use such a large tag, but this project fit the bill.

Just between you and me, the tag is actually covering up a minor sewing error (one part of the folded hem was coming loose, so I had to sew a 2 inch line under the existing line to keep it in place)--and noone can tell! It's actually a blessing in desguise that I needed something like this in this exact spot because it makes the bag look more store-bought and adorable.
I have a Weekender Sweater in there that is nearly complete and there's still about half the height space left for additional knitting or yarn.
I love it so much. I plan on using the leftover fabric to make a small project bag for socks. I might, however, have to turn it horizontally, as I don't have much left, but I feel like I can't chunk the leftover fabric from this print. It's too cute!
My husband was pretty impressed with this one. He looked at me and was like, "you really should sell these Anna!" My response was that I'm still learning to sew and I worry that there will be a flaw (like a seam not wearing well due to my novice skills), and it took me two hours, despite it being an easy project. Maybe in the future though, when I feel like all of my homemade project bags have held up well in the years.

But for now, he has volunteered me to make a backpack-style one for going to places like Six Flags.

Thursday, February 07, 2019

Pattern Release: Vamp City Socks!

Vamp-up your style with some sexy lace socks that would kill to be in some black boots. They’re dying to be worn, so why don’t you get out your stakes-er-needles and knit them up!

Valentine’s Day Sale! Grab this pattern for only $2.14 now until 2/17 at 11:59pm CT. No coupon needed.
METHOD: Top-down

MATERIALS:
Yarn: less than 400 yards of fingering weight yarn
Needles: set of 4 dpns (or one 40+’’ circular needle) in the size US 2 ½ (3 mm) and 1 darning needle
Notions: 1 stitch holder, 1 stitch marker, (Optional) 3 yards of matching ribbon (1 ½ yards per sock)

US 2.5 (3 mm) GUAGE: 32 sts and 42 rows= 4’’ in stockinette stitch

LEG MEASURMENTS: 8 ½’’ long and 3 ½’’ wide (unstretched lace)

ABBREVIATIONS:
K=knit P=purl St(s)=stitch(es) WYF=with yarn in front WYB=with yarn in back
DPN(s)=double pointed needle(s) RD=round P2tog=purl two sts together
K2TOG=knit 2 sts together P2SO= pass 2 sts over right needle YO= yarn over
SL 1= sl 1 st (purl-wise) WS=wrong side RS= right side
 
I knit these socks and first published this pattern for a vampire-themed KUAS yarn club back in 2008. Flash-forward to February of 2019...I realized this pattern was never added to Ravely! Whoops. So, I completely "revamped," (yes, pun intended) the pattern instructions and photos to give it a more modern KUAS Designs look.

My goal with all of my patterns is to be clear and accessible to knitters of all levels. I try to include tips, or extra details for tricker techniques/instances where I feel a novice knitter might struggle. 

I write patterns in the way my 2004 self would have understood things. I like clear-cut instructions on how the sts are divided on the needles, and how you manuver them during the heel portion. I don't assume that you have knit thousands of socks. I figure that someone reading my pattern might be new to knitting and working dpns, and would benefit from this style of instructions.

These are wonderful socks for boots that rise a few inches above the ankle. Because there's only 60 sts and most of it is lace, it's a super-quick knit. 
You can't help but feel pretty in these.

Friday, February 01, 2019

When Socks Attempt to Bite the Dust

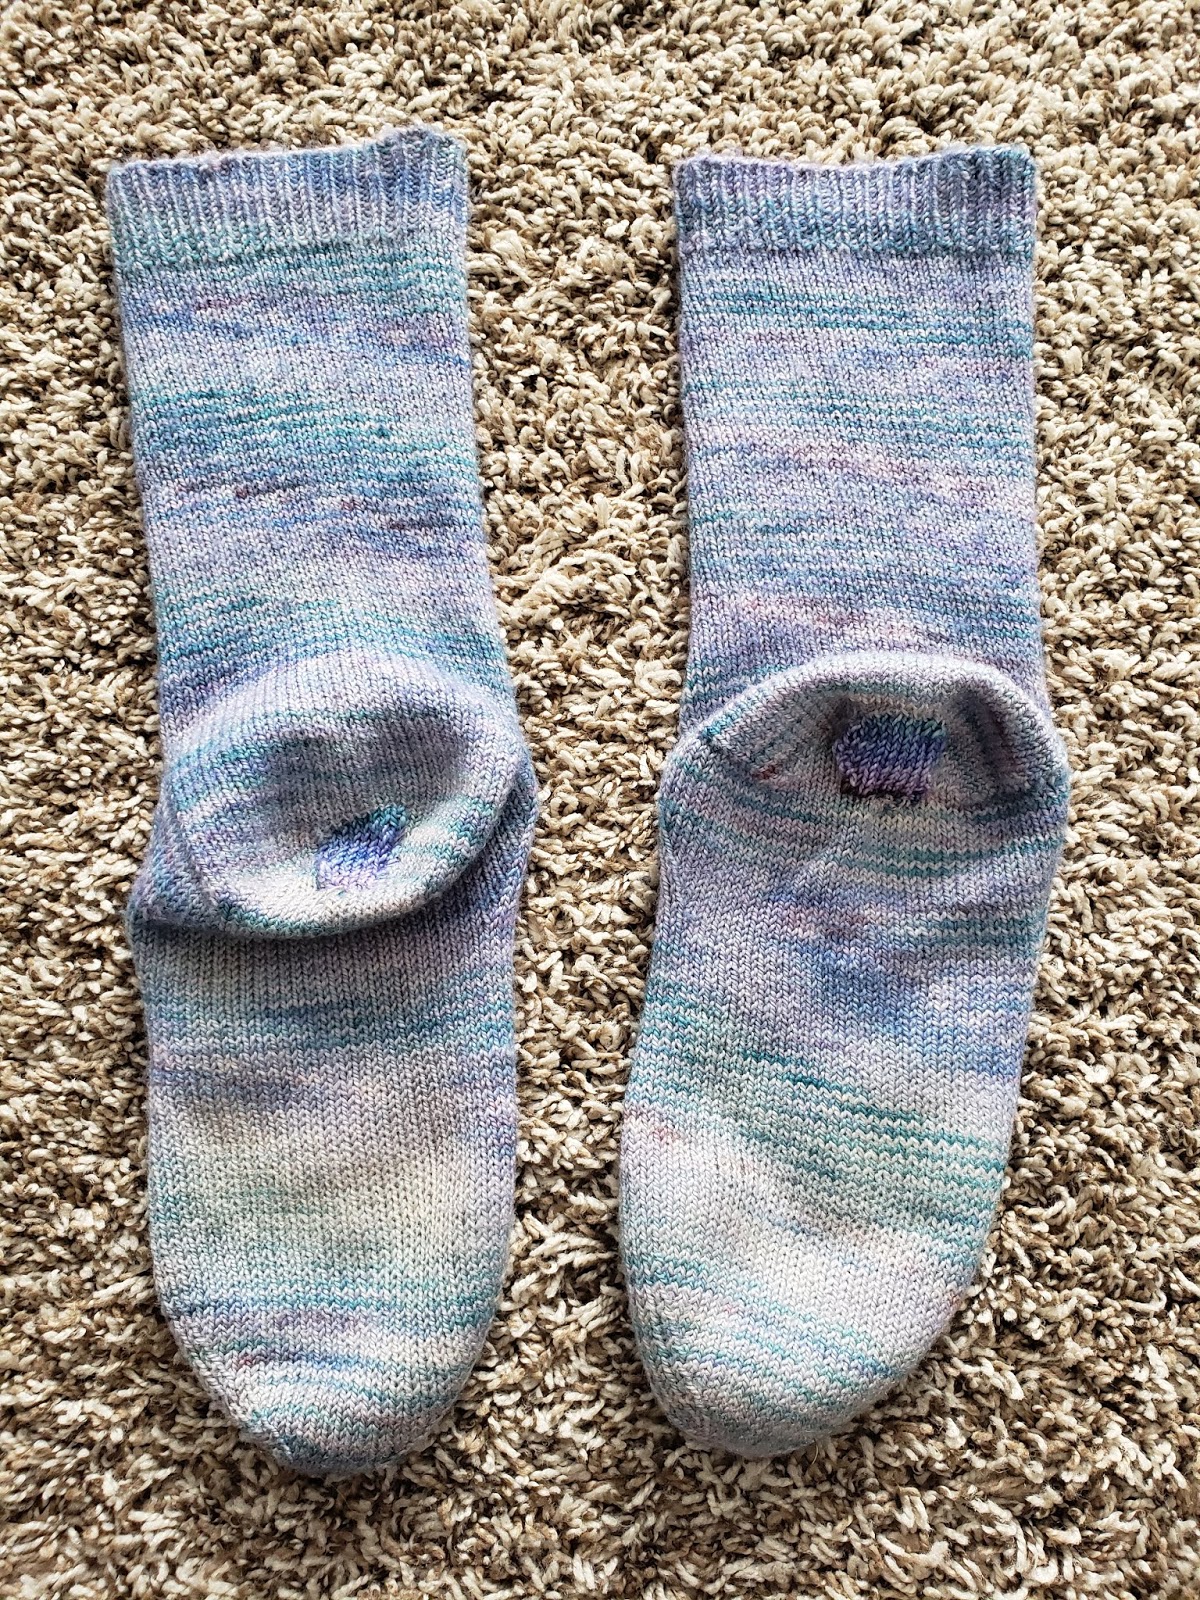
Sooner or later, our socks attempt to bite the dust. I say "attempt," because it looks really, really bad when there's holes the size of your, well, entire heel because you never thought to check the bottom decade-old handknit socks. FYI- wearing your handknit socks with "winter dry heels" is really not a good idea for preservation.  (Nor does wearing worn socks with felted clogs.)

They look pitiful, and act as though they should retire to a good, quiet life in a memory box or landfill, but that's not going to happen to this pair. No sirrie. Not until the fat needles click.

Brace yourself, this is what 11 years does to a sock. This is when it was a spring chicken:
These were my Gypsy Socks that I hand-dyed back in 2008. Did you know that I used to sell yarn (back before kids)? I know...it's been forever. Here's the original blog post on the socks. They were beautiful in their hayday.

I digress: have you read Nicolas Sparks books? I haven't since maybe 2010. They are like Hallmark movie channels...once you read one or two, you've read them all. ;)

Luckily, I have a little box of leftover yarn that I've been saving for when I eventually make a Cozy Memories Blanket. I was hoping to start that after several more pairs of knit socks so I could have a wider range of colors available to use.

Look how much the colors have faded over the years. There has been a couple of accidental washing machine episodes, but those luckily hasn't felted it more than what you see.
One sock was in a more desperate state than the other. I picked up stitches according to the size of the hole. Unfortunately, these holes were right on the heel turn portion of the sock, in which you can only do so much to make the patch-work match the original shape of the heel.
Sorry, I didn't take a picture while it was in action. However, I picked up one stitch on each side every row--sometimes knitting them together with the first or last stitch and sometimes keeping the extra stitch as an increase, depending on the shape of the hole. I did not pick up the very edge of the stitch, but picked up the stitch before/after the loose stitches because the stitches around the edge of the hole are worn and frail. As "fun" as this was (please note the sarcasm), I don't want to have to re-patch in a month or two.
You can see how the inside is all felted around the hole.
All in all, it wouldn't win a ribbon at a state fair, what with it being all worn and now has an awkward square in the middle of the heel, but it does the job. Hopefully I can still get a year or two out these if I treated it more gently. Maybe buff my heel? Don't wear it in clogs and boots?

These socks have always been a little loose due to the stretchiness of the fiber content, which wears them much faster. Always knit socks to be form-fitting.
It looks good enough, and the goal was to knit a patch in a manner that mostly blends in and doesn't feel odd on the bottom of your heel. Check.

I'm curious. Have you had to patch a sock heel yet?

Wednesday, January 30, 2019

WIP: "Hermione's Everyday Socks" in Noro Sock Yarn


I have finally decided to use my ball of Noro Kureyon Sock Yarn that I bought in college. You might be seeing a theme here: start using yarn bought over a decade ago. It's a noble cause. However, you get to the point were it's nestalgic, and then you don't feel like you can use the yarn unless you have found the absolute perfect project for it.
I divided the 100g ball into two seperate balls. I am making no attempt to line up the colors as I knit the socks toe-up. This will be my first pair of mis-matched socks, and I can't think of a better way to do this than rustic yarn that looks handspun.

Yarn: Noro Kureyon Socks (single-ply yarn), colorway 185 S
Needles: US 1.5 (2.25mm) and US 1 (2mm)
Started: sometime in 2018 (started for car-knitting, and then hibernated)

Although there's some purple in it, this colorway is really out of my regular colorway preference, so I hope the colors work up nicely.
This pair of sock lives inside my lovely Sailor Moon project bag from Otterly Adorable Knits and my bamboo yarn bowl from Darn Good Yarns. Don't you love how the colorway matches the colors in the bag? It's the little things in life. I got this bag almost a couple of years ago during a slump in my life. Sailor Moon was my favorite anime show back in middle school, so this is me channeling my inner child for a few smiles.

There's so many shades of purple in this sock colorway. In the wrong lighting, it almost looks like one giant purple chunk. The green/yellow really looks much nicer in person though.

I was planning on working another shortrow heel, but since there's already large sections of one color, I plan on doing an afterthought heel with a contrasting color from the leftover yarn.

In the midwest (Illinois), everything is shut down right now. We have having historic extreme temperature with -30's-40's+ for the wind-chill. They are telling us that if you stay out longer than 5 minutes, you might actually loose a limb to frostbite, or get hypothermia. Yikes. We are actually have colder weather than Antartica at the moment. Hopefully it blows over in 24 hours and our furnace and water pipes come through this unscathed.

Stay warm! Times like these really make you grateful for the basic necessities that you have--warmth, shelter, food and er, knitting.

Monday, January 28, 2019

FO: French Press Slippers

Yarn: 2 balls of Paton's Classic Wool in the color teal--double or triple stranded
Needles: US 15
Started: Jan 24, 2019  Completed: Jan 25, 2019
The easy portion is knitting the parts. (The hard part is the felting.) I timed knitting the "top" of the slipper, and each one took me roughly 25 minutes. The bottom is more like 30ish minutes. It seems like this whole thing should take an hour of knitting from looking at the photo.
To a first time felter, it might look as though you totally messed up with your gauge, since it's almost twice the length of the final product. They look like slippers for clown feet, and the stitches are messy looking on size 15 needles because the stitches need to be loose enough to felt properly. 
I placed the slippers in the front-loading washing machine with some towels, and it did felt the slippers some, but I found that I still had to do the majority of the felting by hand. (And it's hard on my hands.) I had to open the window in 0 degree F because it is a workout. Felting by hand takes about an hour of dedication to get it "just right." I always end with something really cool, but always say to myself, "no more felting for a long while."

The first version I knit was my MIL's French Press Slippers from December 2016, so it's been long overdue that I knit myself a pair. 

I love the idea of writing a message in puffy paint on the bottom of the slipper (instead of just doing no-slip squiggles) if you are gifting these slippers to someone. The other slipper actually said "do not machine wash" on the bottom.
 Teal is one of my favorite colors aside from sea-green, aqua and lavender.

In hind-sight, I would knit 2 extra sts for the "top" of the slipper pieces. For both set of slippers, it felted so much and sits much too low when you wear it. The heel has always been tricky too. I still have to figure out how to get it not to pucker out. One slipper heel ends up fitting better than the other heel, and I can't figure out how to sew the heel to better stay on the heel.

Upcoming post: "Hermione's Everyday Socks" using Noro yarn