Showing posts with label tutorial. Show all posts

Monday, November 19, 2018

NEW Pattern Release: the Super Bulky Hat

CLOVER POM-POM MAKER TUTORIAL INCLUDED!
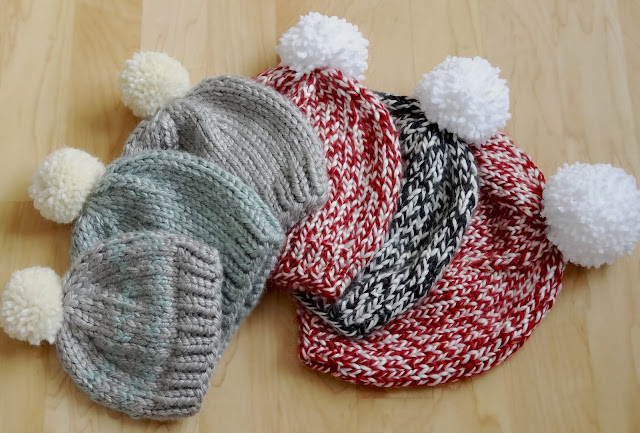
Here’s a wonderfully speedy bulky hat pattern for all sizes, with handy sizing chart columns that you read vertically and a pom-pom tutorial on page 6 for your convenience. This pattern is wonderful for those last-minute gifts that need to be knit up, whether it’s for a baby shower, a Christmas present, or just needing a quick knit when the weather gets chilly!

I spent a long time test knitting my own pattern to have numerous sizes! It all started with my son Sam requesting a Christmas hat (which I accidentally knitted the adult version first).

HAT MEASUREMENTS:
0-6 months: 5.5’’/14 cm long; 6.5’’/16.5cm wide
6-12 months: 6.25’’/15cm long; 7’’/18cm wide
12-24 months: 6.75’’/17cm long; 7.75’’/20cm wide
2-5 years: 7.25’’/18cm long; 8.5’’/21.5cm wide
6-12 years: 8.25’’/21 cm long; 9.25’’/23.5cm wide
Teen/Adult XS: 9’’/23cm long; 9.75’’/25cm wide
Adult S/M: 9.25’’/23.5cm long; 10.25’’/26cm wide
Adult L/XL: 9.5’’/24cm long; 10.75’’/27cm wide

From left to right: size 0-6 mos, size 6-12 mos, 12-24 mos
From left to right: size 6-12 yrs, 6-12 yrs, Adult S/M

MATERIALS:
YARN: Super Bulky (6WPI) yarn
0-6 months: 38yds/67g (plus 10-12g of worsted weight yarn for pom-pom)
6-12 months: 45yds/75g (plus 10-12g of worsted weight yarn for pom-pom)
12-24 months 50yds/80g (plus 10-12g of worsted weight yarn for pom-pom)
2-5 years: 52yds/85g (plus 10-12g of worsted weight yarn for pom-pom)
6-12 years: 68yds/110g (plus 15g of worsted weight yarn for pom-pom)
Teen/Adult XS: 85yds/140g (plus 15g of worsted weight yarn for pom-pom)
Adult S/M: 90yds/145 (plus 15g of worsted weight yarn for pom-pom
Adult L/XL: 100yds/165g, plus 15g of worsted weight yarn for pom-pom)

NEEDLES: Set of 5 dpns, or 1 long circular needles in sizes US 10 (6mm) and US 11 (8mm) needles

NOTIONS: Beginning of rd st marker, darning needle, sharp scissors, and (optional) Clover Pom-Pom maker (Size 46mm /Yellow=medium; Size 65mm/green=large)

I hope you have a wonderful start to the week! I will be announcing the Black Friday week deal very shortly!

Tuesday, September 30, 2014

Craft Tutorial: Fall Acorn Decor

Happy Fall!
I came across this cute craft project idea recently. I'm not sure if I pulled it up from the depths of Pinterest or one of my fall-related magazines that just came in the mail, but nevertheless, here's a cute and easy acorn decor project that leaves a BIG impact! Would you like to learn how to make one (or more) of these?
*ACORN DECOR TUTORIAL*
 
MATERIALS:
1 (or more) acorn squash
Glue Gun (low temp is fine)
3-4 glue sticks per acorn project
A 3/8'' x 50ft manila rope bundle (approx 12.5 feet per acorn.)  

This project is roughly $4-$5 per acorn (pennies for glue, $2.25 per 12.5 ft rope, plus $2-$3 per acorn) 
You can get up to 4 acorns per rope bundle.

STEPS:
1. Warm up the glue-gun. Make sure you rest it on a plate or cardboard. You'll thank me later.

2. About an inch or so higher than the middle section of the acorn, start your first row of rope. Glue the end very thoroughly to the acorn, and glue like no-one's business in 1-inch sections (press the rope down immediately), spiraling all the way around the body of the acorn. If you glue too much in advance, it will harden too quickly on the cool skin of the acorn.

3. Once you have reached the tip or handle of the acorn, start wrapping and gluing in a spiral fashion around the "handle" of the acorn just like the body. This will be about 3 rows.

4. Cut the rope and glue cut-end securely down so to not have any pesky fraying.

That's it! This will look great next to your pumpkin and gourd display. :)
I'm so back-logged on photo editing. I have photos on trips and activities, an awesome restaurant-worthy Irish Beef Stew recipe and of course knitting to show you when I get some more spare time!

My old best friend just had her second child. I was going to make her baby (and 1 yr old toddler) a cute owl hat! Here's the beginning of it:
I used a chained cast-on method to have a nice accent color. It finishes the ends off nicely. Much better than single-crocheting after it's finished. It's actually worked 2-needle style.

Wednesday, February 19, 2014

KUAS Podcast Episode #2: Saucy

g.
This is the podcast that was recorded yesterday, but I ran out of time to post it the same day. Let me know if I'm doing something right, because it is a little time-consuming.

Podcast & music by Anna Maliszewski. Copyright 2014.

Episode #2: Saucy
1. Work-in-progress knit: Frozen River Slouch by Anna Maliszewski (KUAS Designs).

2. Tutorial on how to cable without cable needles using the stitch "2-st RPC (tbl)" and "2-st LPC (tbl)". Materials needed: 1 plastic stitch marker with a slit in it + your project that you will cable on.
You can find a video of just this tutorial under my tab "Video Tutorials."

3. Frogging & spring cleaning of WIP's.

4. Hot Sauce: Wing Master Buffalo Wing Sauce in the "Garlic Parmesan" flavor from the Pepper Palace (www.pepperpalace.com). $7.99.

For more podcasts or tutorials, please visit my tab "KUAS Podcasts" on my blog or SUBSCRIBE to my Youtube page.

Give me a shout-out if this no-cable trick has been handy!
Sorry for the haziness, this was done at night!

Join the Ravelry Group KUAS Podcasts.
Subscribe to my YouTube Page for more videos.