Reversible Beret and Fingerless Gloves
Pattern By: Anna Maliszewski
Download PDF
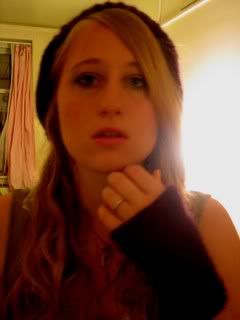
 Sometimes, women just need instant gratification (and chocolate). Gracie was a highly satisfying and fun project that I did freehand as my first knitted beret. I was amazed on how fast this knit up. Use bulky yarn, and you'll have your holiday gifts knit up in a flash--in under a weekend!! Never grump again about all that extra yarn you have left after the project is done...make matching fingerless gloves!
MATERIALS:
Yarn: Bulky soft wool or alpaca (hat: approx. 200-250 yards)
Needles: set of 4 dpns, size US8 & Size US9 circular needles (24'') and a darning needle.
SIZES: S/M & L/XL
MEASUREMENTS:
Ribbing: 19.5 inches diameter for the small/medium, unstretched. This will fit a decently big head. If you are worried, bump up to size 9 US needles on the ribbing, or dare to knit the XL size.
Height: about 9 inches.
GAUGE: 4.5 stitches= 1," & 5 rows= 1'' on size 9 US.


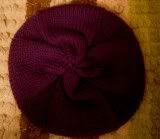
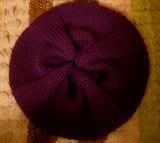
(stockinette side)........(garter side/original intent side)
Pattern By: Anna Maliszewski
Download PDF
 Sometimes, women just need instant gratification (and chocolate). Gracie was a highly satisfying and fun project that I did freehand as my first knitted beret. I was amazed on how fast this knit up. Use bulky yarn, and you'll have your holiday gifts knit up in a flash--in under a weekend!! Never grump again about all that extra yarn you have left after the project is done...make matching fingerless gloves!
MATERIALS:
Yarn: Bulky soft wool or alpaca (hat: approx. 200-250 yards)
Needles: set of 4 dpns, size US8 & Size US9 circular needles (24'') and a darning needle.
SIZES: S/M & L/XL
MEASUREMENTS:
Ribbing: 19.5 inches diameter for the small/medium, unstretched. This will fit a decently big head. If you are worried, bump up to size 9 US needles on the ribbing, or dare to knit the XL size.
Height: about 9 inches.
GAUGE: 4.5 stitches= 1," & 5 rows= 1'' on size 9 US.


(stockinette side)........(garter side/original intent side)

To be so young and talented. I love your designs. Thanks for sharing
ReplyDeleteThanks for posting the pattern, I recently made the beret and love it, can't take it off. Great work!
ReplyDeletehey, i love this hat and i'm trying to make one for myself, but i'm not getting instructions 3 and 4. i knit 16, place a marker, yo, k1, yo, place another marker, and repeat through the row, but i still had several stitches left over that weren't enough to knit another 16 stitches. could you please clarify?
ReplyDeleteOK. Well, my first question has to be, did you read the "special notes you should read before you start the pattern" type of section right before the instructions? It might be the brackets [] that are screwing up. If you have extra stitches, than that probably tells me that you already completed #3 and #4, and are still knitting 1 stitch, instead of [3], the next time.
ReplyDeleteI hope that helps. :)
I think your Special Note should say that we should place the markers before doing step 3, not during. Or to just place them around the two YOs in step 3 (so three stitches in between and not one like it says). The way it is stated implies that we would place the markers before and after the first YO, which would screw up step 4.
ReplyDeleteDear Kat-
ReplyDeleteThe PM's are actually supposed to be before and after the YO. This would, however, require you to slide the PM, swing the yarn around inbetween your two needles so nothing wacky happens to your YO's. Basically, just make sure that your YO's are kept inbetween the PM's... because that's the whole area that is being increased. The PM's just mark the whole boundary of that area.
That's absolutely right, but what I'm conveying is that the instructions presuppose the placement of the markers. To have only one stitch in between the markers, you would need to place them on the last round before step three, not during as the special note states: "On your first time doing instruction #3, place PM's as directed: one after every 16(19)stitches, and after every 17 (20) stitches. In other words, there will be one stitch in between your two PM's."
ReplyDeleteOr it could say, 'On your first time doing instruction #3, place PM's as directed: one after every 16(19)stitches, and then make the first YO, k1, make the second YO, then place the second PM. In other words, there will be three stitches in between your two PM's.
I think this will make your intentions clearer.
Thanks, Kat for clarifying. I do see now what you mean.
ReplyDeleteI cut & pasted the instructions so that it is right before instruction #3. It now instructs you do to it on the last ribbing row before instruction #3.
I hope that now solves any form of confusion. :)
Thanks again!
Anna
First off, let me say this is a great design. I love the top. It looks so pliable and malleable.
ReplyDeleteSuggestion: in taking pictures of you or your projects use a flash (fill flash). You've done so much to make your projects a success. The flash will help them "shine".
Thanks for the suggestion.
ReplyDeleteI don't like to use flash on my camera (at all, actually), because my camera distorts the actual color of any picture when the light flashes. It's not the most expensive camera ever. Everything ends up turning yellowish when the flash is used...
I try to use a room with a clear or white light, and do without the flash...and it ends up looking almost exactly like the real color.
In that particular picture though, the reason why it was really wonky was not because it had a flash or was flashless...the light in that room was a weird yellowish light they installed in the dormatory. Plus, the walls were starting to turn way off-white. I probablly should have done a picture during the day and did without the light at all. I do hate that picture... which is why you have another (clearer) picture of the back of my head.
why do you have to k tbl? can i just k normally?
ReplyDeleteYou can knit regularily if you'd like. The Ktbl was used on the ribbing portion of the slouch for a different ribbing effect.
ReplyDeleteHi,
ReplyDeleteI'm on number 12 and 13 now but I am quite confused on what to do.
The note says upon second round, to remove the second PMs. Which second round are you referring to ? During the second round of #13(first set) ? During the 2nd set of 12and 13?
And from what I understand from your instructions, by the time I do #13/2, I'll have to knit from PM A1 to PM B1 cos A2/B2/C2/D2 have been removed. Wouldn't the stitch count for the purled areas be affected as a result? The "slide PM" instruction in #13 wouldn't apply cos the pattern has shifted.
Great pattern and thanks for sharing with us. One suggestion, please consider changing the font you are using in the directions. Something less 'design-y' would be much easier to read.
ReplyDelete